OK, let’s do this.
There are a lot of blog posts describing how to create all Amazon AWS resources to host a static website like the one created by Hugo. Since, I have a DevOps background, I felt this urge to automate this process. In my professional life, I use Ansible … a lot. It should not come as a surprise that I picked this tool to automate all the things.
Requirements
- hugo >= 0.17
- ansible >= 2.1.x
- aws-cli >= 1.11.x
- Amazon AWS account
Domain Name
You also need a domain name. If you haven’t got one, register one, either via Amazon AWS Route53 or some other Domain Name Registrar (I chose TransIP).
Update nameservers (optional)
If you used Route53 to register your domain, you’re done: the domain is already added as a Public Hosted Zone in Route53 and you’re ready to go.
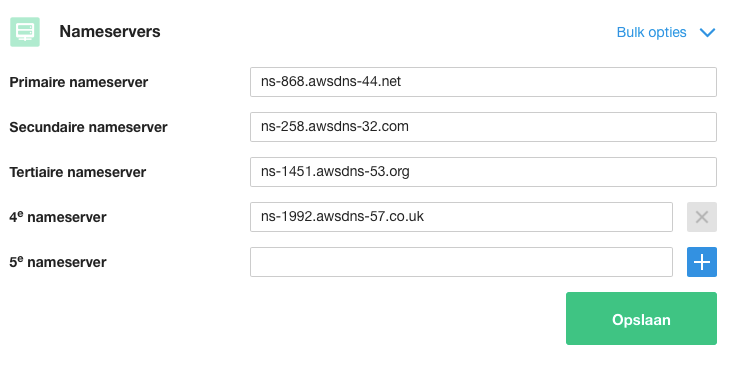
If you’re using a different registrar, create a Public Hosted Zone and write down the values of the NS record (see image).
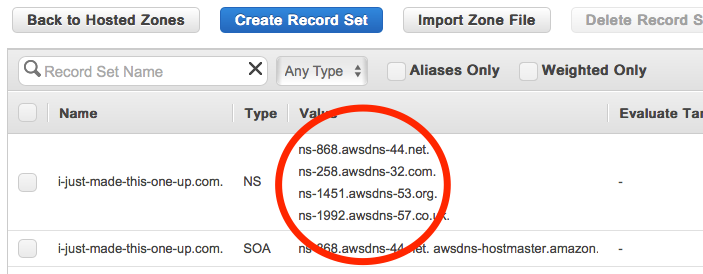
You need those values to update the nameservers with your domain. As an example, here’s what I had to change with my registrar (~ excuse me for being dutch ;))
After you updated those nameserver settings, wait for a bit, and all DNS queries will be routed to Route53. This means you can create DNS records in Route53. As I said, this step is totally optional, but now you got an API! This essentially means you can create DNS records using tools like Terraform, Ansible, Chef, Puppet, and what not.
Create Amazon AWS resources
Let’s start with a simplified overview. Here’s what we’re going create:
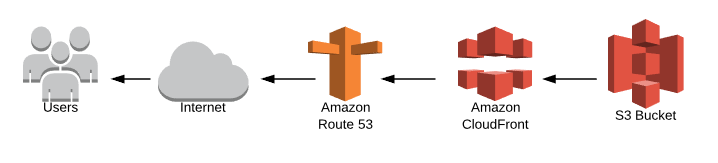
That doesn’t seem that complicated, now does it? Also notice that no compute instance (like EC2) is used. This means it’s compatible with the 2016 buzzword: serverless!!1!
Where:
- S3 Bucket: will contains all generated and static content (html, css, js and images).
- Amazon CloudFront: this Content Delivery Network (CDN) service replicates all files across the globe so users experience the best possible speed.
- Amazon Route 53: the Domain Name Service (DNS) that translates an easy to remember DNS record to our CloudFront distribution.
- TLS/SSL certificate: we’ll use the Amazon Certificate Manager (ACM) to request a TLS/SSL certificate to encrypt all traffic to and from our website. (~ ah, … I forgot to include this one in the overview … please forgive me)
After all resources are created and aligned, world domination awaits. Endusers around the world will be able to access your website.
Let’s start with my project directory:
 .
 ├── ansible
 │   ├── roles
 │   │   ├── hugo-aws-infra
 │   │   ├── hugo-s3-deploy
 ├── ansible.cfg
 ├── Makefile
 ├── site.yml
 ├── hugo
     ├── content
     │   ├── ... <hugo content>
     ├── static
     │   ├── ... <static stuff>
     ├── themes
     │   ├── ... <hugo themes>
     |-- config.toml
The hugo directory contains my website, created with the command hugo new site whatever. I picked a theme from http://themes.gohugo.io and created content (~ you’re reading it).
Notice that I’ve downloaded the Ansible roles from Github to the ansible/roles directory (for Github links see bottom of this post).
I’m using this simple Makefile to start it all:
.DEFAULT_GOAL: usage

ifneq (,$(findstring debug,$(MAKECMDGOALS)))
ANSIBLE_DEBUG=-vvv
endif

ifneq ($(tags),)
$(eval TAGS:=--tags '$(tags)')
endif

ifneq ($(skip),)
$(eval SKIP_TAGS:=--skip-tags '$(skip)')
endif

ANSIBLE=ansible-playbook $(ANSIBLE_DEBUG) $(TAGS) $(SKIP_TAGS)

usage:
	@printf "\nUsage: make site [OPTIONS]\n";

debug:
	@# dummy target to prevent the msg "No rule to make target 'debug'"

site:
	$(ANSIBLE) \
		-i localhost \
		-e BASE_PATH=`pwd` \
		--extra-vars "$(MAKEFLAGS)" \
		site.yml
… and this Ansible playbook is executed.
---
  - name: Create Hugo infra on Amazon AWS
    hosts: localhost
    gather_facts: true

    vars:
      website_domain: foobar-it.com
      verbose_output: true

    roles:
      - role: hugo-aws-infra
        s3_website_domain: "{{ website_domain }}"
        verbose: "{{ verbose_output }}"
        tags:
          - infra

      - role: hugo-s3-deploy
        hugo_base_path: ../hugo
        s3_website_domain: "{{ website_domain }}"
        verbose: "{{ verbose_output }}"
        tags:
          - deploy
Notice the tags; use them to restrict the either the creation of all AWS infra or deploying your static website to S3. See the following examples:
# do all the things
$ make site

# only infra
$ make site tags=infra

# only the s3 part within infra ... in `debug` mode
$ make site tags=s3 debug

# push static site to s3 in `debug` mode, ... with `verbose` mode on
$ make site tags=deploy debug verbose=true
The possibilities are endless, … use it as you see fit.
Final note
I’ve shown you the quick route to deploying your static website to Amazon AWS. I haven’t talked about how I actually created all the resources. You could have a look yourself, but in a next post, I’ll highlight a couple of parts which I think deserve some more attention. Also, I’ll show you how to setup a CI/CD pipeline using Jenkins.
And, as promised, here are the Github links for the Ansible roles I created:
~ enjoy!